Suppose, right now you have a WordPress website and you configured your template, read a little about template tags, and maybe even modified the functions.php file in the theme editor of the administration panel.
But now, you want your skills to move to the next level and dig deeper into the code.
Luckily, WordPress is a good CMS to start. There is a good bunch of documentation available, the code is easy to read for the most part, it is self-explanatory and not too hard to remember.
In this article, I will show you a brief introduction to the world of WordPress programming. While this post is aimed at beginners, I will assume you know how to edit WordPress files and you have looked at a file from your WordPress theme, even if you don’t understand what is going on inside the file.
What programming languages used in WordPress
WordPress uses a number of different programming languages. If a language has to be pointed out as the “main”, this would be PHP. PHP is the language that is work on the server side and feeds about 82 percent of the web.
WordPress also uses HTML, CSS and Javascript. HTML is used to give the structure of the site and is used by all websites. CSS provides style to an HTML document. For example, CSS makes its background white, dark grey text and places the sidebar to the right. JavaScript, on the other hand, adds advanced features such as sliders and other interactive features.
Finally, WordPress also uses MySQL as the database. MySQL is used for example to retrieve the last 10 entries, or all entries in a particular category of the database.
Well, yes, the bad news is that this is a considerable amount of knowledge. The good news is you don’t need to know everything to start with WordPress, in fact, you can start working with very little. You can learn programming through WordPress by just copying and pasting examples from documentation.
Some tips for the one who starts programming
The best way to learn is through tutorials, documentation and the work of others. The difficulty with programming does not come from the complexity of the languages involved. If you break down into components, everything you learn will easy.
If programming can be difficult it is for two reasons. You need to know a lot of simple things and in order to create a successful product, you have to be able to think in terms of systems, which takes a little practice.
What you should be clear about is that as you learn how to code for WordPress, you will have a lot of moments of authentic despair.
You’ll be frustrated by the lack of understanding from the start, thinking that a code is perfectly formed and doesn’t work, you’ll spend hours struggling with it just to find out that you’ve forgotten a semicolon. This is all perfectly normal. Every programmer has faced this, not just you.
What WordPress is not
It is important to realize that technically, it is not the same “code in WordPress” and the “WordPress code”. WordPress has a lot of code written in PHP. For example, Joomla and Drupal (two other content management systems) are also written in PHP.
Let’s explain the above a little better. Saying “WordPress code “is like saying a”BMW car”. BMW, Mercedes and Nissan are all cars. They’re all built with nuts, bolts and welds. The difference between them is how they are put together, design philosophies and lace practices.
WordPress, Joomla, Drupal and all the other CMS systems and frameworks that exist, are all built with the same components. The difference between them is the coding philosophy and methodologies they use.
How to work with PHP
As I mentioned earlier, PHP is a server-side scripting language. In contrast, HTML is a document markup language on the client side. Let’s analyze HTML first to understand what this means.
The way in which your browser interprets the HTML code is the following: When you visit an HTML page send the HTML code to your browser. The browser processes the information and returns something you recognize as a website.
When the browser visits a page that uses PHP, an intermediate step is used. First the PHP code is processed by the server. The result of this processing is an HTML page, which is sent to the browser and displayed for you to see.
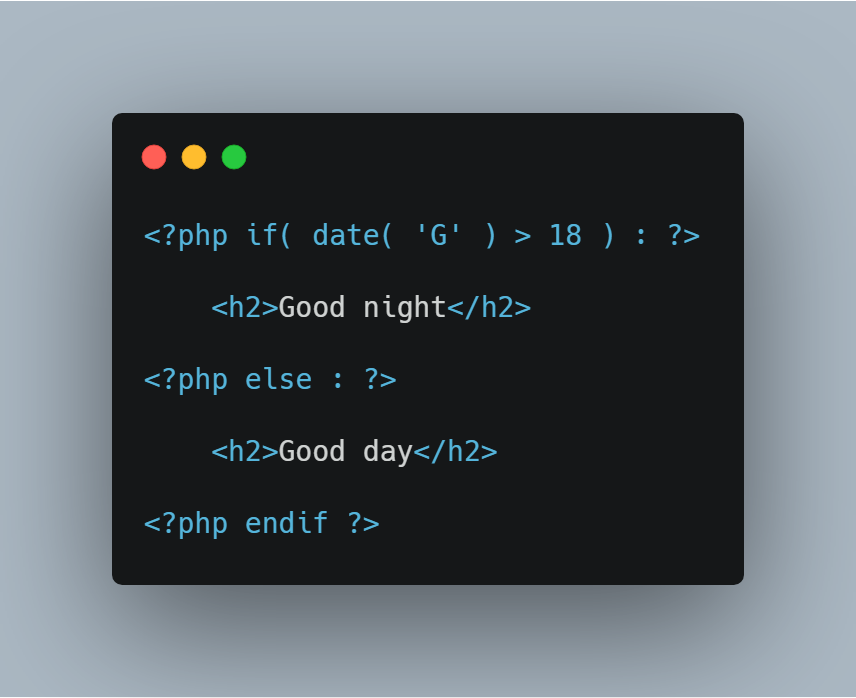
Let’s see a practical example with real PHP code:
Without any knowledge of PHP code, we can get some information about this. Just by looking at it, one can interpret that in a particular set of circumstances it will show “good night”, and in others it will show “Good Morning”.
When we look at the source of the resulting website there will be no trace of this code. All you see is” good morning “or” good night ” depending on what circumstances. This is because the server performs the processing and only sends the result.
In the example above, the date function has been used to determine what time it is. date(’G’) returns a number from 0 to 23, where 0 represents midnight and 23 represents 23:00. If the value of this function is more than 18 (which is after 18:00) we show good night. Otherwise it’ll show us the Good Morning.
Now we know two things about PHP. We are allowed to use if statements to display content according to our own criteria. We also know that it has functions, which help us carry out our objective. The date() function returns the current date in a given format. The strtolower() function converts any text to lower case.
PHP in WordPress
With that last paragraph in mind, you can recognize PHP everywhere in WordPress. Opens the content.php from the default theme Twenty Fourteen and check it out. This file shows the content of the blog posts in the topic.
Let’s compare the first line of this file (discard the comment at the top)…
… With the output generated when you visit the page:
We can understand from the comparison that the_id() function is replaced by the ID of the article in question. The post_class () function adds a lot of classes for the HTML element. These help us to stylize our entrances later on. It is not important at this stage to know why these specific classes are added, We are only becoming familiar with functions.
Later, looking at the lines from 24 to 28 we can also see an if statement:
The IF statement contains is_single(). This is a function that returns ‘true ‘if you are looking at a single “single post page” entry page, otherwise you will return ’false’. When it is true, and we are on a single page, we use the_title() function to issue the title.
If it is false, we continue to use the_title () function, but we make sure it is a link to the only entry page.
Note that some functions are empty, while some have parts and parts inside them. For example, is_single() is a boolean function while the_title() has something in the parenthesis.
The elements within the parenthesis are called arguments. Each function has different arguments separated by commas, which can be learned through documentation. The Codex article on The_title () shows that this function has three arguments:
1. The first argument allows us to add HTML before the title.
2. The second allows us to add HTML after the title.
3. The third parameter determines the time the title is displayed or simply stored for later use.
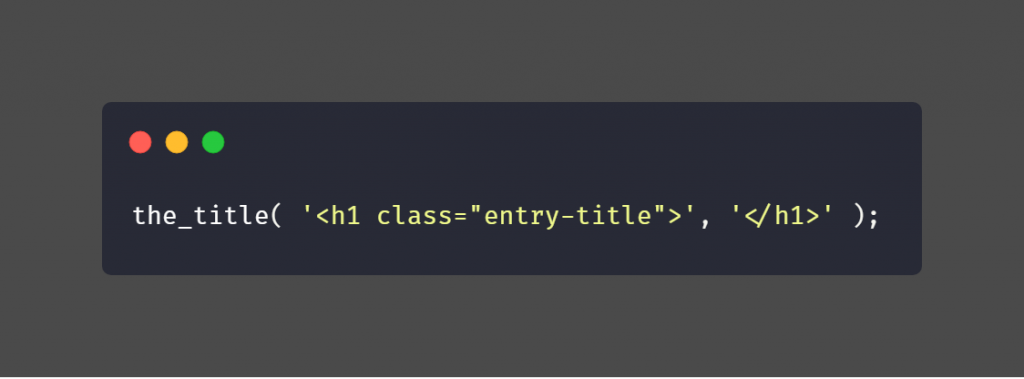
Based on this, we now understand what is happening on line 25 of the content.php file:
The function displays the title, but an H1 opening tag is attached to it and the final tag is attached.
The result of this code is the following in the browser:
How to raise the skill in WordPress coding?
You probably don’t want to spend weeks messing around through PHP documentation and learning everything from the beginning. But you must, and I also recommend that you experience as much as possible.
Do you want to pass the list of labels from the bottom of the article to the top? The_tags () function at the bottom of the content.php file seems to be the key.
First we will remove it. Then, when saving and updating the page, the tag list disappears. This is good, because it means that it is the function that gives out the labels. Now you just have to copy it and paste it into various parts of the file to see where it ends.
It is likely that the higher you include the code, the higher it will be in the content. With a little experience, you will be able to identify things like the_excerpt() and the_content() being responsible for displaying content, so putting them anywhere above them will place them above the home page.
Learning how to code for WordPress in this way is fun and encourages you to read the documentation, which is always a very good thing. Don’t worry if you don’t understand everything, you get to a point where you do it soon enough.
Learning bad practices
A disadvantage of this method is that you employ bad practices. While my recommendation to copy and paste the function the_tags() to the top of the file works in any part of the HTML for the footer, which uses the label of the foot of the page, you will need some modification to make it a correct code.
Once again, forget about this for now. You’re not building on a professional level code to display to Google. You’re trying to learn the basics and figure out how everything works. This is not an easy task and mistakes are part of the process.
Once you have a good knowledge of the code behind WordPress, you can start learning about its bad practices, and you can start studying the coding patterns and figure out why we do things the way we do it.
An important overview about the WordPress code
WordPress has a series of” subsystems“, such as the” loop ” that controls the entries shown. Hooks that allow to modify the default functionality, several APIs and the course of themes and plugins. Let’s see a brief introduction to some of the most important systems that may appear.
Debugging
By default, WordPress will hide any code errors. This is recommended, but can lead to two problems during development. If you make a non-fatal error, you will not receive error messages and your code, either it will do nothing or it will not produce the expected result.
The other question is a white screen of death. No error messages, just a blank screen with no access to the front or backend. To ensure that this does not happen, you must enable debugging, which will provide you with error messages.
This can be done by editing the wp-config.php file in the root directory of WordPress installation. Find the line It contains: define (‘WP_DEBUG’, false); and change false to True “true”. That’s all there is to it.
Child theme
Child themes are separate themes, which are based on a main theme. They inherit everything from the parent theme, unless otherwise specified. This is the only safe way to modify a theme. As I mentioned earlier, the easiest way to learn is to modify an existing theme.
If you create a child theme based on Twenty Fourteen, you can still customize it to your liking, even you can also update the theme without losing all the changes. This is something you should also take into account when working with customers. Always – always use a child theme.
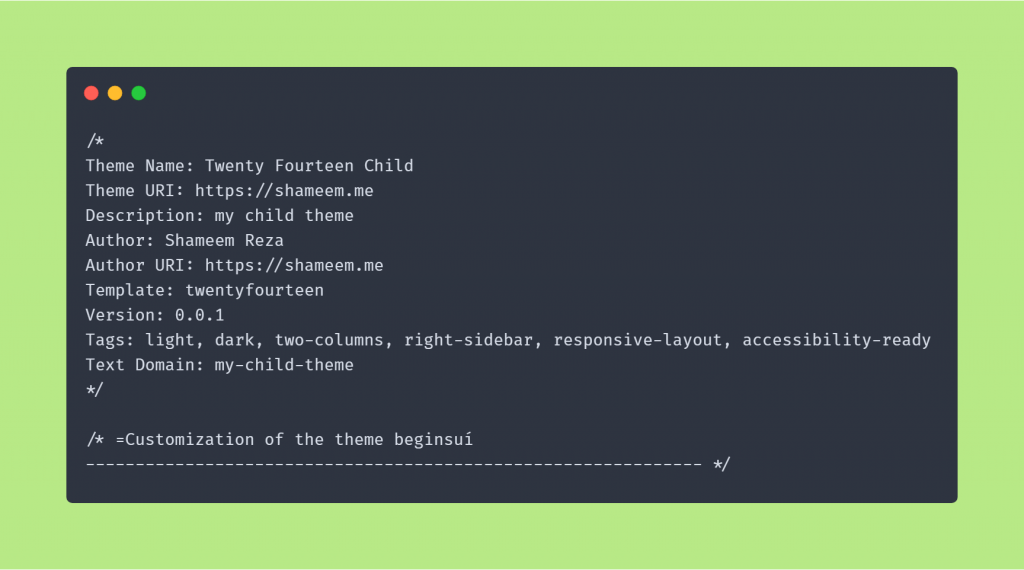
Creating a child theme is a child’s play. You just need to create a new folder in the themes directory and the name you want to give it. For our example, we will create a folder called “child-theme”. Inside this folder we create two files; style.css and functions.php. Open the style sheet and use the following to create the child theme:
You can actually use what you want in the example above, the only restriction is the line that starts with “Template”. This should contain the directory name of the main theme.
For the use of child themes, the rule is as follows: every time a file is uploaded to WordPress it looks for it in the child theme first. If it does not exist, the same file from the parent theme will be the one that carries. The only exception to this is the functions.php . Function files for both themes will be loaded, first the child theme and then the main theme.
At this point you can change to your child theme, but your place will be devoid of any style. Based on our previous rule, it’s easy to see why. The stylesheet is loaded from the child theme as style.css exists in the child theme, but it does not contain any style information.
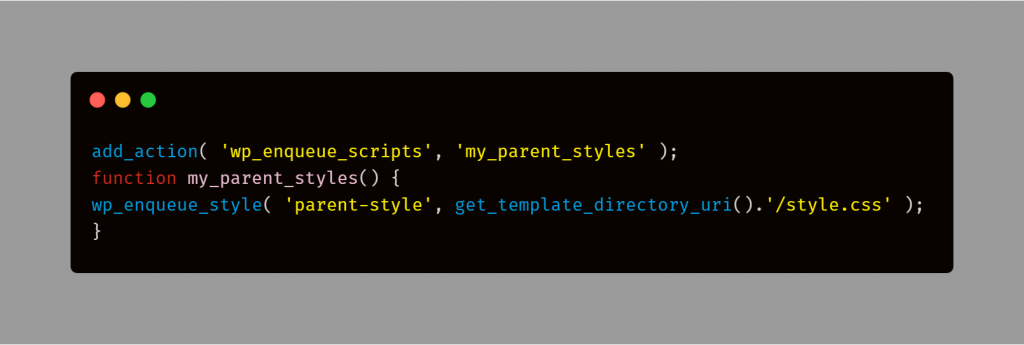
The next step is to load the styles of the main theme. This can be done with “enquue” for the style sheet of the parent theme. Don’t worry too much about this. You can copy and paste the following code into your child theme in the functions.php file. Note that this loads the styles of the parent theme.
Right now your child theme is exactly the same as your parent theme. Now you can start modifying whatever you want. You can use the stylesheet to override styles or add your additional rules. If you want to modify the index file, for example, all you need to do is create it.
If you create an empty index file then any page that uses that file will be blank. All other pages will continue to work well since they use the main theme. You can start by either writing your own code in the index file or you can copy and paste the parent theme code and modify it.
The result of this should be as follows: You can modify the content of an existing theme from its core, but still be able to update the parent theme or change the parent theme again at any time.
The Query and the Loop
The Query is the system that “knows“ which entries to show on a page and The Loop ”loop” is the part that actually passes through each entry and shows them.
For example, on your home page the query looks for the 10 most recent entries. In a Category file page, the query looks for the 10 most recent entries of the given category. The query is used even on individual pages where you see a single post in the database.
The query is something that can be modified and used for your own needs, but for now we will focus on default or standard use. We’ll only use the result through the loop.
The loop takes all the entries that the query has returned and passes through each of them one by one. On some pages, such as individual pages, there is only one entry. This counts as a “collection” of entries, in this case the collection consists of a single entry.
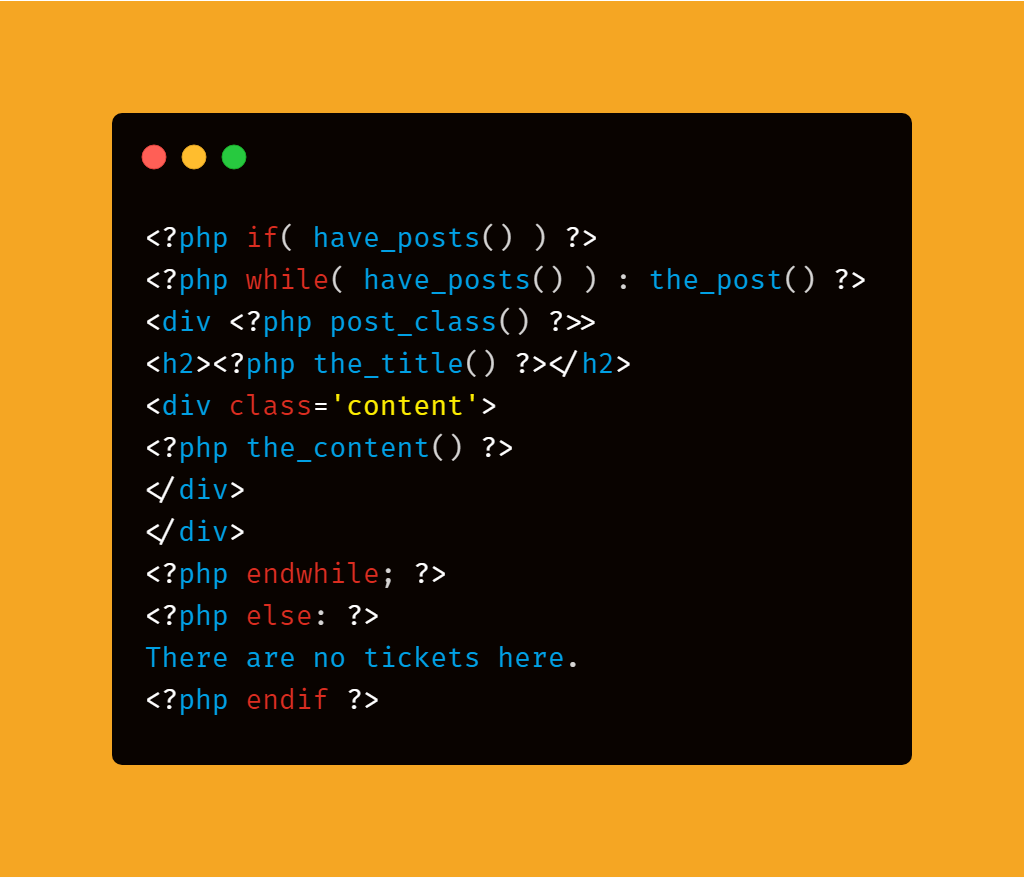
Let’s look at the basic code for a loop and how it passes line by line:
The first line uses an if statement along with the have_posts() function to find out if there is an entry for the query. If there is no entry, the code is executed after the “else” section, which notifies the user that there are no entries.
If there are entries we use a PHP loop. There are a few types of loops in PHP. To review the syntax and some more examples, check out this tutorial on loop types in PHP.
In the above code we use a while loop, which contains the have_posts () function again. This function returns “false” when there are no posts in the loop, or there are no more posts in the loop because all of these have been shown.
Everything inside our while loop runs while the value of this function is true. This is exactly what we need. As soon as we have shown the last post, the value of have_posts() will be false so the loop ends.
Within the loop a very rudimentary screen of a post has been created using the template tags we have learned before.
The loop should be used in any template file of the theme that lists entries. Find pages, individual entry pages, file pages, index file, at any time that are ready entries use a loop.
Custom Queries
It is rare to learn first about custom queries, but seen, it is one of the most sought after themes after WordPress features. In the previous section we have learned how to list entries using the loop, but we are limited so it is returned by default. What if you want to show the following related posts in the same category in an individual entry? This is easy with custom queries and the loop.
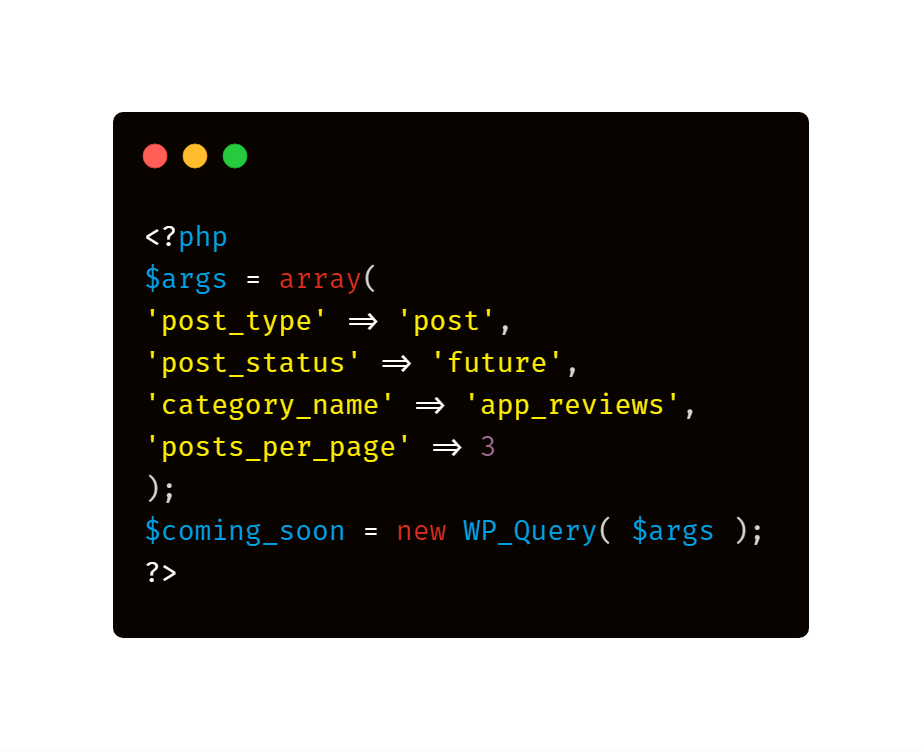
You can create a custom query using the wp_query class. We haven’t talked about the classes, but their use is quite simple. Here is an example that shows the programmed entries of a specific category. You can use this to display a section of “next items in this category”.
As you can see, this is quite simple. To modify this for your needs by modifying the content of $args array. There are plenty of parameters you can use to restrict entries depending on your publishing date, based on their authors, categories, custom fields and much more. Check out the wp_query documentation for a complete list.
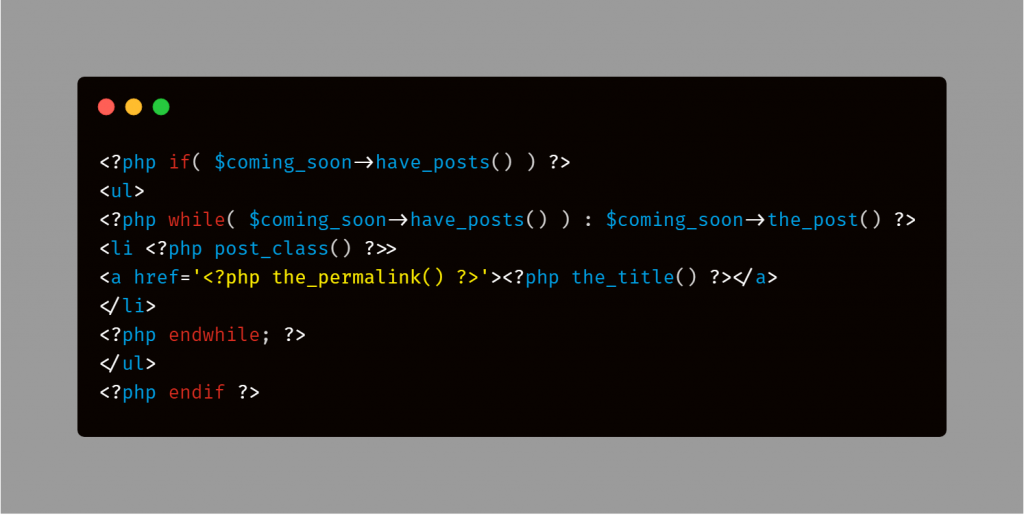
Now that we have a custom query we can use a custom loop to display the content. All we need to do is add the have_posts() and the_post() prefix that works with the name of the variable that contains the query and an ” arrow”:
Note that the else part of the loop has not been used and an HTML list is used instead of divs. From this loop it is intended to list a list of posts below a complete individual post, it is better not to show anything if there are no entries. In addition, a simple list with links in that place should be enough for users to click on them.
Hooks
WordPress uses an ingenious system that allows you to modify the core functions. If you do not understand the WordPress kernel I advise you the following: under any circumstances you should not modify the core files.
This means that you cannot edit any file that comes with WordPress by default.
I know sometimes it seems like the only way, but it should never be done. Anything you may need can be done with ‘hooks’ or other methods. Modifying the central files is not only dangerous, but also anything you do will be overwritten by an updated version of WordPress.
The hooks allow you to modify the default operation of WordPress. They come in two formats: actions and filters “actions/filters”. Actions allow you to run a function of your own in specific places in the WordPress code. For example, by using a hook you can run one of your own functions when WordPress posts a post. This allows the author to be notified, for example.
Filters allow you to modify the data before use. For example, a filter can be used to modify the text shown to the user when an entry is saved. Instead of “Save draft, Publish, Update,” you could modify this to say “draft is saved”.
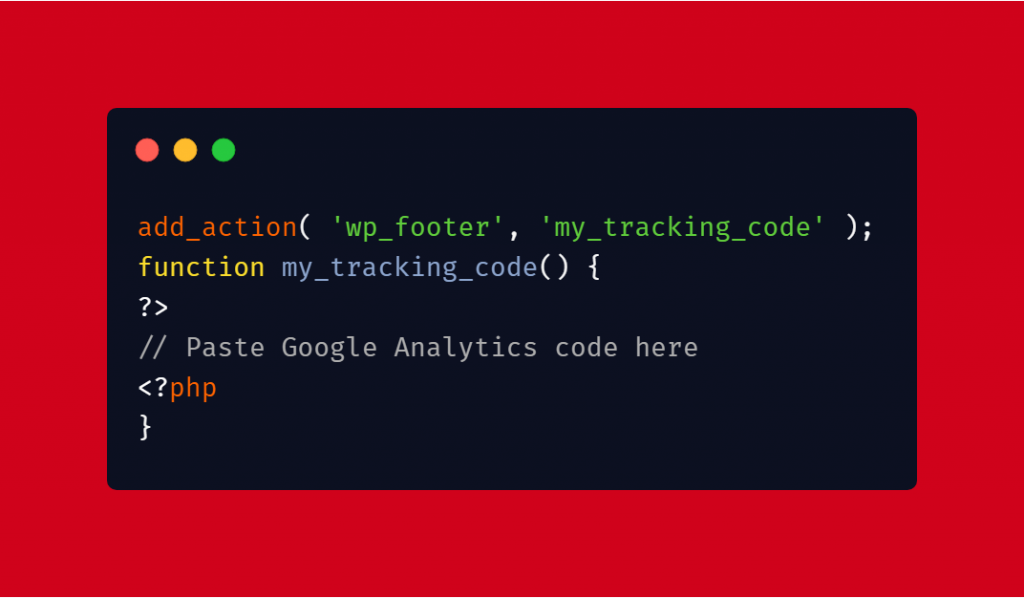
A great example of an action hook is wp_footer. This action takes place just before a theme’s closing body label. It allows you to add your own content to the end of a theme without modifying the footer file of the theme itself. In the functions.php from your theme you could use the following to add a tracking code to your site:
The first line tells WordPress that we would like to add our my_tracking_code() function to the hook wp_footer. When WordPress loads a page and sees the wp_footer hook, it looks at all the functions linked to it and executes them.
Our feature then adds Google Analytics tracking code for the footer.
This is the basis for the operation of the plugins. If you want to create a plugin and paste the same code there you wouldn’t have to modify your theme at all. What this means is that even if you change the subject, your Google Analytics code will continue to work smoothly.
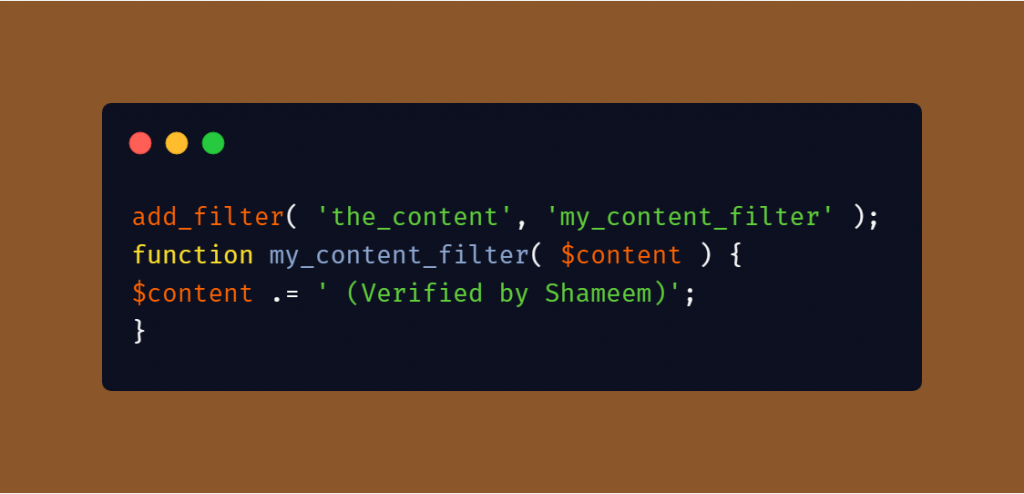
To show how filters work, we will modify the content of a post with one. The_content () filter runs before it displays the content of a post. We use a hook to tie a function so we can modify it.
The following code adds the text “checked by” automatically after each individual entry (or more precisely, at any time the content of the full post is displayed).
Note that the function at this time has received a parameter. Each filter and action can have one or more parameters. You’ll have to check the documentation to see what the particular hook we’re using can do. To get a list of the actions and filters I recommend the reference actions and the reference filter.
Additional reading
There is much you can learn about WordPress and a lot of knowledge is available for free. I’ve gathered some resources for you and categories. I hope you find these resources useful.
Documentation WordPress
- WordPress Codex – main page of all documentation of WordPress. Codex will soon be replaced by developer resources.
- Template tags – functions you can use in loops
- Conditional tags-functions that return true or false in specific scenarios
- Reference to WP_Query-the place to go if you need a custom query
- Function reference-a huge list of functions you can use
- Action reference-if you need to run your own functions
- Filter reference – if you need to modify strings or matrices used by WordPress
- Hook reference – full reference to action and filter
- Developed a Plugin – start guide to writing plugins
- Develop a theme – the introductory guide to creating a theme
- Child themes-a guide to creating a child theme
- API WordPress – A list of uses the API of WordPress
- Class reference – a list of uses classes for use in WordPress
Full courses
- Codecademy – Codecademy have interactive classes for several languages
- Treehouse-amazing videos in a variety of related topic coding
- Tuts+ – major courses on a number of different topics
Learning about PHP
- PHP Manual-the official PHP documentation
- Codecademy – interactive Tutorial complete PHP
- W3Schools – great full PHP tutorial
- Tizag – another full PHP guide
HTML, CSS, and Javascript
- W3Schools-W3Schools has full tutorials to all languages and more
- HTML 5 Doctor-a great place to learn about new tags and subtleties of HTML5
WordPress support Forums
Advanced topics
- Sass – CSS with superpowers
- LESS– CSS-with support for variables and functions
- OOP PHP – object-Oriented PHP
- SQL Tutorial -Learn how to consult the database yourself
- Modern Laracasts-PHP and Laravel tutorials
- Koala-free, cross-platform compiler code
- Prepros-Premium, cross-platform compiler code
- CodeKit – Compiler code OSX
- Grunt-free, compiler-based terminal
What else resources do you use to ;earn WordPress development? Share your guides in the comments below.
