
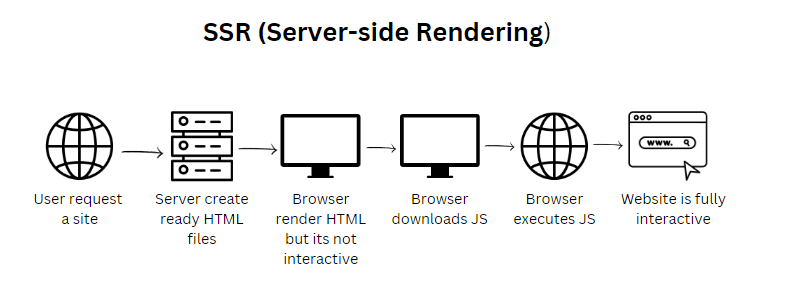
Server-side rendering (SSR) is a technique for rendering a client-side JavaScript application on the server before sending the fully rendered page to the browser. This approach has many benefits, including improved performance, SEO, and user experience. Next.js is a popular framework that makes it easy to build SSR applications with React.
One of the main advantages of SSR is improved performance. When a client-side JavaScript application is loaded in the browser, the browser must first download and execute the JavaScript code before the page can be rendered. This can take significant time, especially on slower internet connections or older devices. With SSR, the server has already rendered the page before it is sent to the browser, so the page is ready to be displayed as soon as it is received.
Another advantage of SSR is better SEO. Search engines have difficulty indexing client-side JavaScript applications because they rely on the ability to execute JavaScript to see the page’s content. With SSR, the content is already rendered on the server, so search engines can easily index the page. This is especially important for businesses that rely on search engine traffic.
Finally, SSR can also lead to a better user experience. With a client-side JavaScript application, the user may see a blank page or a loading spinner while the JavaScript code is being downloaded and executed. With SSR, the user sees the fully rendered page immediately, which can lead to a more seamless experience.
Next.js makes it easy to build SSR applications with React. The framework includes built-in support for SSR and offers a simple development experience with a powerful set of features.
Get Started with Server-side rendering in Next.js
To get started with Next.js SSR, you can use the create-next-app command to create a new Next.js project. This command will create a new project with a basic file structure and a few example pages. Once you have your project set up, you can start building your application by creating new pages in the pages directory. Each page is a React component that will be rendered on the server.
For example, let’s create a new page called about.js in the pages directory. This page will display some information about our application.
To navigate to this page, we can use the Link component provided by Next.js.
This is just a basic example, but it demonstrates how easy it is to create a new page with Next.js and navigate to it.
You can also use the getInitialProps method to fetch data from an API and pass it to your pages as props. This method is called on the server before the page is rendered, allowing you to fetch data before sending the fully rendered page to the browser.
In this example, we use the axios library to fetch data from an API and pass it to the About component as a prop.
Next.js also offers a built-in development experience with hot module replacement, automatic code splitting, and more. You can start a development server with the npm run dev command, which will automatically reload the page whenever you make changes to your code.
In addition to its built-in features, Next.js also has a large and active community. There are many plugins and libraries available that can help you add additional functionality to your application. You can also find many online tutorials, articles, and other learning resources to help you get started with Next.js.
In conclusion, Server-side rendering has many benefits, including improved performance, better SEO, and a better user experience. Next.js makes it easy to build SSR applications with React and offers a simple development experience with powerful features.